As environmentally conscious growers increasingly seek sustainable ways to enhance soil fertility and agricultural productivity, biochar has emerged as a popular soil amendment. Its unique porous structure promotes moisture retention and aeration, resulting in healthier plants. However, applying raw biochar may not yield the best results, as it often lacks essential nutrients and beneficial microorganisms. This is where biochar inoculation becomes crucial. In this guide, we’ll discuss the importance of inoculating biochar, how to do it yourself, what to include in the process, and the best timing for maximum effectiveness.
Why Inoculate Biochar?
While biochar excels at retaining moisture and improving aeration, raw biochar can initially deplete nutrients from the soil, impacting short-cycle crops like vegetables and strawberries. Inoculating biochar with nutrients and beneficial microbes transforms it into a nutrient-rich medium that enhances rather than depletes soil fertility. This preparation not only improves soil health but also supports vigorous plant growth.
Understanding Biochar Properties
Biochar is produced through pyrolysis, a process that involves heating organic materials (like forestry residues) in a low-oxygen environment. This method minimizes harmful emissions while preserving organic carbon. For example, TerraTonic Biochar boasts a high pH of over 8, more than 85% organic carbon content, and remarkable porosity, with a surface area of 309 m²/g. It can retain water up to six times its weight, making it an invaluable addition for improving soil moisture and drainage.
Key Considerations for Biochar Inoculation
To maximize the effectiveness of inoculated biochar, keep in mind the following factors based on your specific crops and soil conditions:
- pH Levels: Adjust the biochar’s pH to match your soil conditions using organic acidifiers such as coffee grounds, vinegar, sulfur, or pH Down.
- Organic Matter: Integrate compost, manure, or other organic materials to enrich biochar with nutrients.
- Soil Conditioners: Incorporate conditioners like humic acids (e.g., Humax) or yucca extract (e.g., Natural Wet) to increase nutrient and microbial availability.
- Beneficial Microbes: Add mycorrhizal fungi or bacterial inoculants to promote plant growth and improve nutrient uptake.
- Nutrients: Ensure balanced soil fertility by incorporating a multi-nutrient fertilizer containing nitrogen, phosphorus, potassium, and micronutrients.
DIY Biochar Inoculation Methods
Here are two straightforward methods for DIY biochar inoculation: compost charging and rapid charging.
Method 1. Compost Charging
This method integrates biochar into your compost pile, enriching it with nutrients while facilitating the composting process.
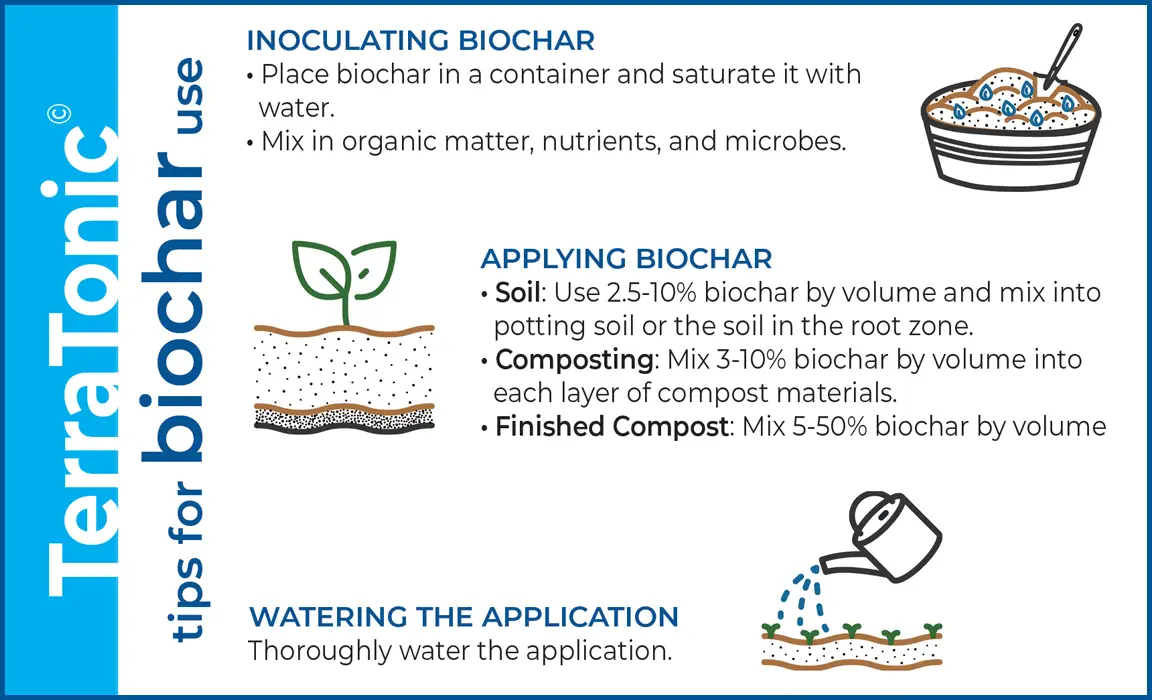
- Mix: Incorporate biochar at 5-10% of the total compost materials into each layer of the compost pile. Be sure to water the pile and mix it according to standard composting guidelines. Alternatively, you can combine biochar with finished compost in 5-50% rate. Both methods enhance nutrient cycling and expedite the composting (curing) process.
- Add Extras: For optimal results, consider adding manure and crushed bones if available. This age-old practice, particularly observed in the Amazon basin, contributed to the creation of Terra Preta soil, which remains fertile to this day.
- Tip: Add a thin layer of biochar to farm animal bedding before use. When the used bedding is added to your compost pile, it creates a “double-charging” effect, benefiting both the biochar and reducing odors and disease among the animals.
Method 2. Rapid Charging
If you’re short on time, rapid charging allows you to inoculate biochar in just a few hours or days.
- Prepare Your Materials: Fill a large container with biochar. In a separate container (or in a fertilizer sprayer), mix fresh water with soluble fertilizers according to package instructions. Combine this solution with the biochar and mix thoroughly.
- Add Nutrients: Incorporate additional nutrients, beneficial microbes, compost tea, worm castings, or leachate. Adding local soil, especially from areas with healthy plants, can enhance microbial diversity.
- Rest Period: After mixing, you can apply the biochar mixture directly into the soil. However, letting the mixture sit for 1-7 days before application allows the biochar to absorb nutrients and microbial life effectively.
When to Inoculate?
For optimal benefits, inoculate your soil with biochar after harvest. Preparing the soil in advance ensures it is ready for planting, laying a healthy foundation for the upcoming growing season. Regular applications of inoculated biochar each year or season help foster a thriving soil ecosystem, ultimately reducing reliance on chemical fertilizers over time.
Conclusion: Optimized biochar for soil health and plant growth
Inoculating biochar significantly enhances its potential as a valuable contributor to your farm’s success. Whether you choose the compost charging method or the faster rapid charging technique, the benefits of using inoculated biochar for soil health and plant growth are substantial.
If you prefer expert assistance, consider using custom inoculation services from companies like Jeden Bioscience. These services save time and ensure your biochar is tailored to your specific needs with the right soil conditioners, pH levels, nutrients, and beneficial microbes.
Embrace the power of inoculated biochar and watch your farm flourish! Happy farming!


